1、此电脑—->右键管理
2、双击Windows Update 进入,常规—->启动类型–禁用
3、到这里就按确定的话,系统之后还是会自动更新。
4、恢复—-> 无操作—->应用—->确定
5、这样就可以了,从此电脑无自动更新。要更新即手动更新了。
6、此电脑—->打开设置—->更新和安全—->Windows更新—->检测更新

我家资料站
1、此电脑—->右键管理
2、双击Windows Update 进入,常规—->启动类型–禁用
3、到这里就按确定的话,系统之后还是会自动更新。
4、恢复—-> 无操作—->应用—->确定
5、这样就可以了,从此电脑无自动更新。要更新即手动更新了。
6、此电脑—->打开设置—->更新和安全—->Windows更新—->检测更新
XP连打印机,WIN7和10要连接,得开启SMBv1
1.复制这段:
echo n | powershell Enable-WindowsOptionalFeature -Online -FeatureName SMB1Protocol
粘贴到TXT文本里,另存为BAT文件,运行它就OK了(这段只针对WIN10)
亲身经验
2.如果是WIN7想要连接共享 的打印机(XP电脑上)
复制这段:
Reg add “HKLM\SYSTEM\CurrentControlSet\services\LanmanServer\Parameters” /v “SMB1” /t REG_DWORD /d “1” /f
Exit
一样的操作
安装打印机驱动,确定打印机在本地可以使用。
开始里面搜索打印机,按照下图顺序,进入管理打印机属性界面

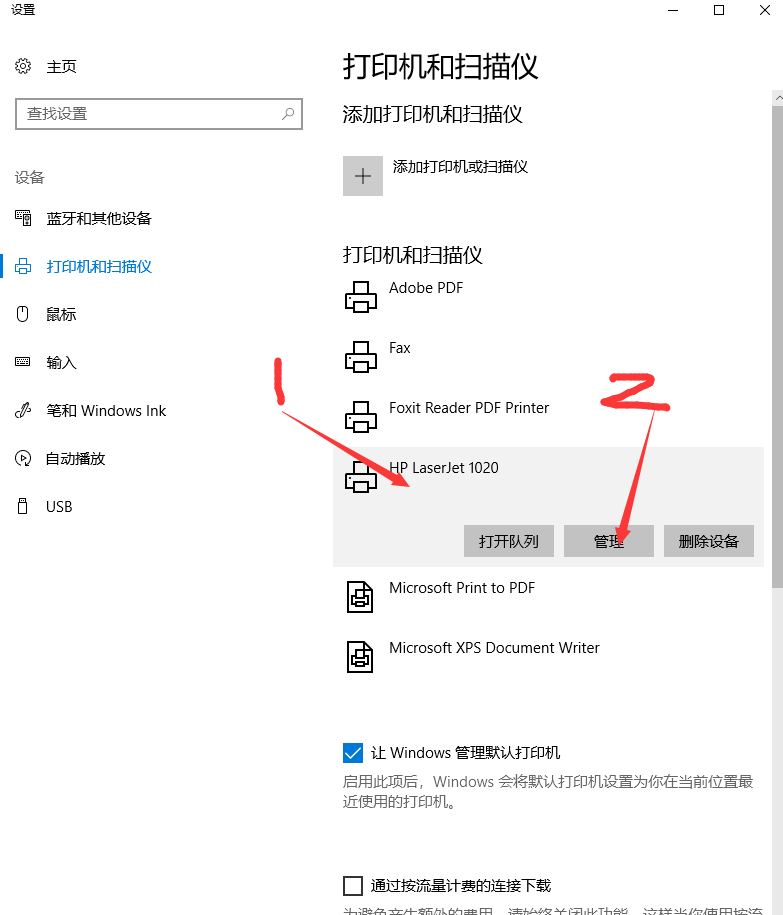
勾选共享此打印机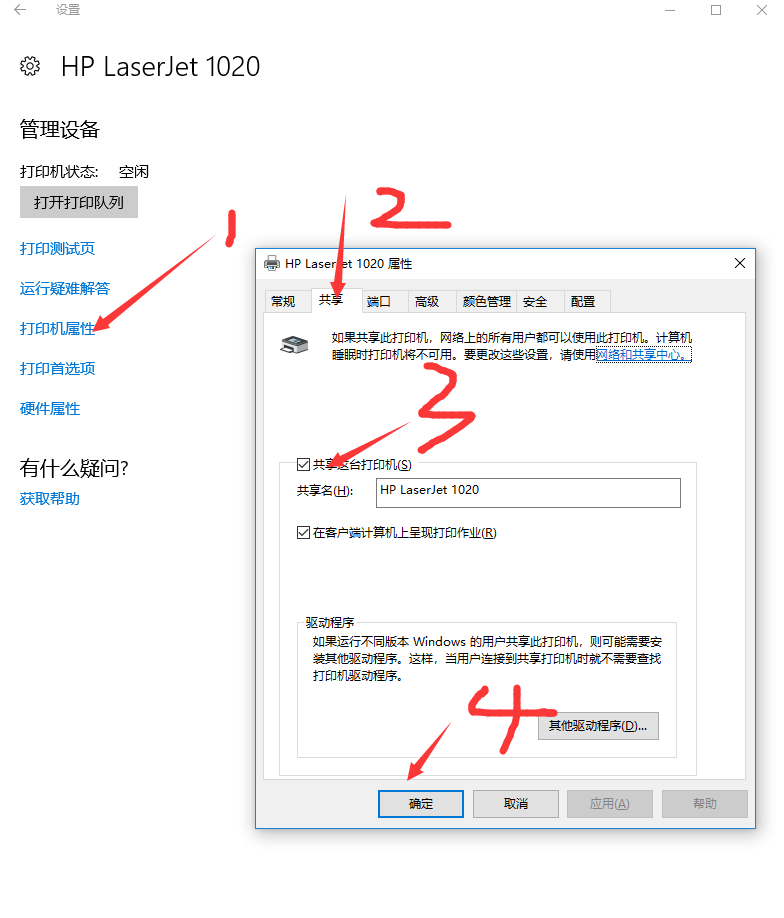
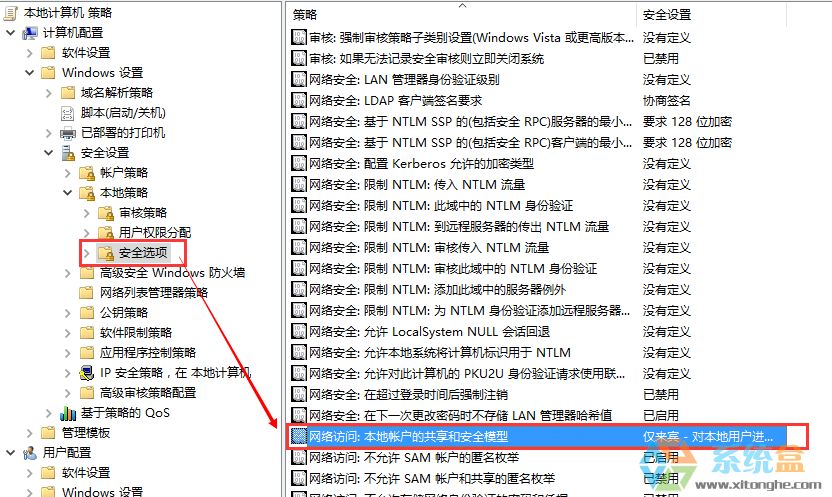
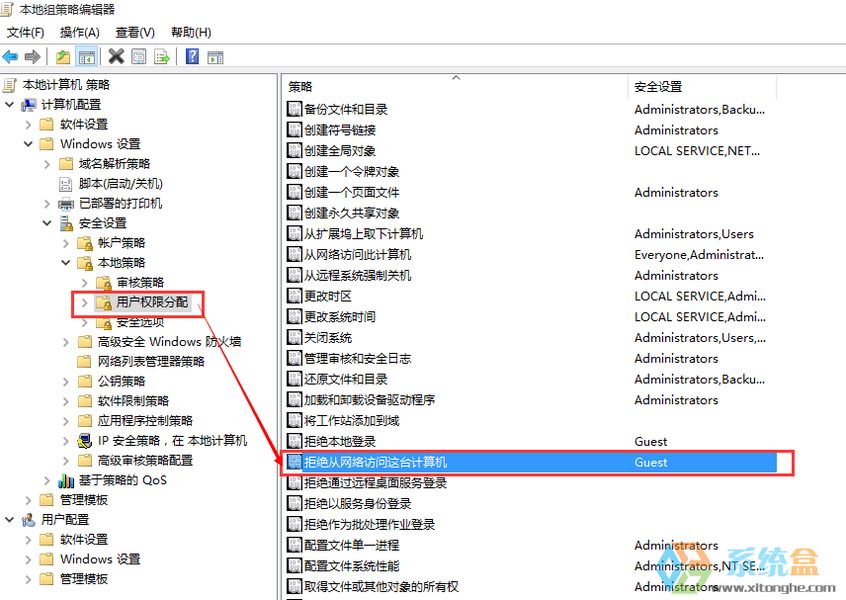
(这里的修改很重要,win7和win8【拒绝从网络访问这台计算机】默认为空,只有win10默认添加了guest)
1、WIN+R然后“运行”里输入secpol.msc,打开本地安全策略
【本地策略】—【安全选项】—【网络访问:本地账户的共享和安全模型】—改来宾
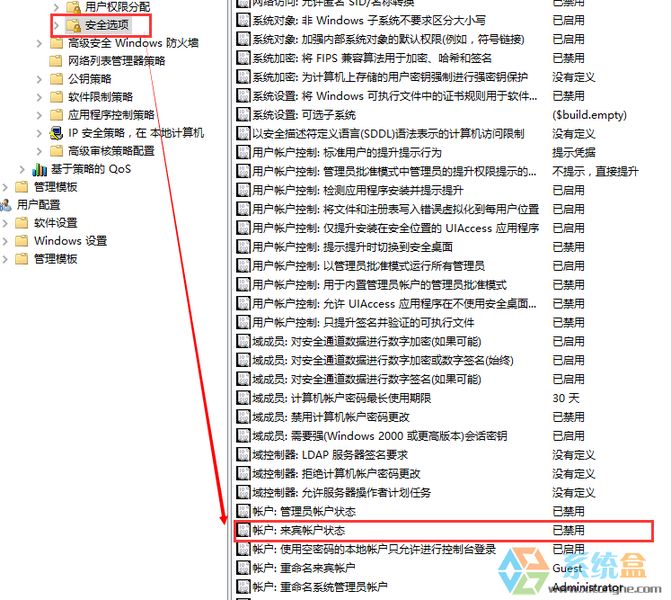
【本地策略】—【安全选项】—【账户:来宾账户状态】—改启用
【本地策略】—【用户权限分配】—【拒绝从网络访问这台计算机】—删除guest
如下三图所示:
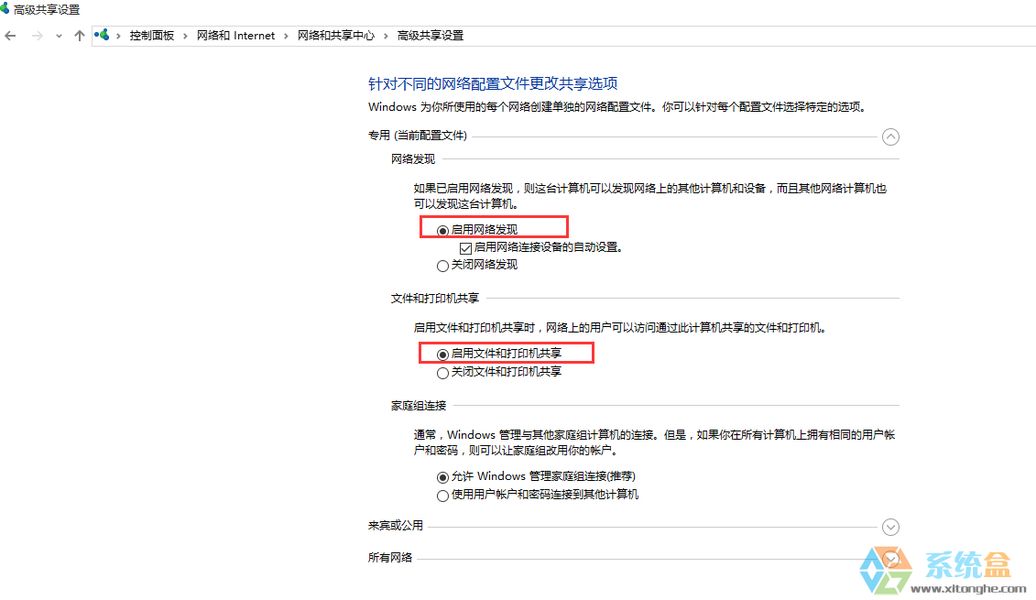
| 1 2 | 控制面板—>网络和共享中心—>选择家庭组和共享选项—>更改高级共享设置 <当前配置文件> |
<所有网络>
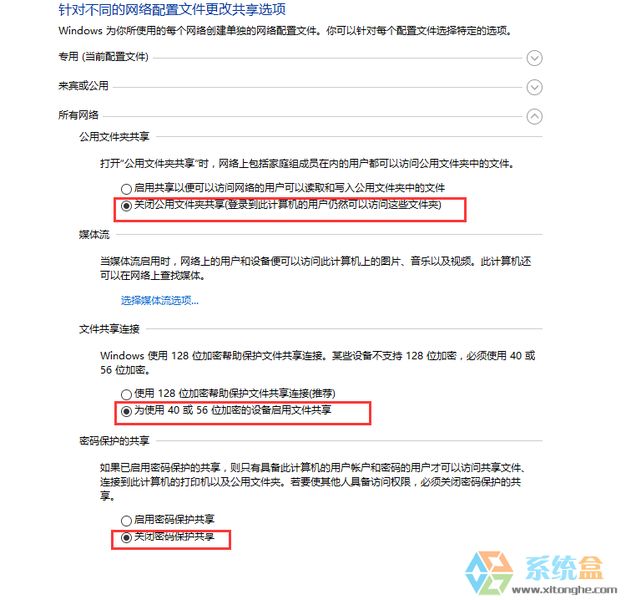
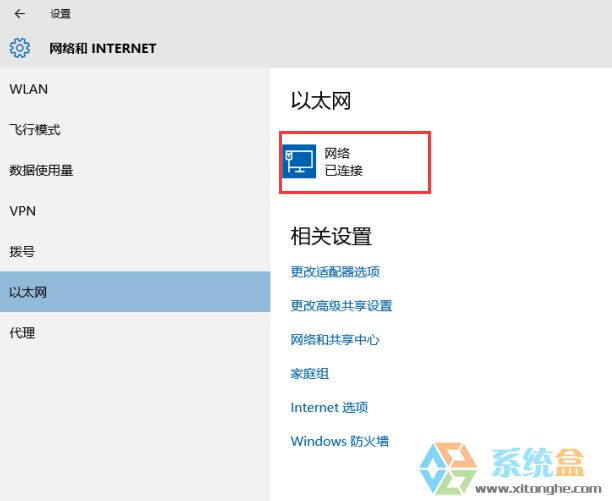
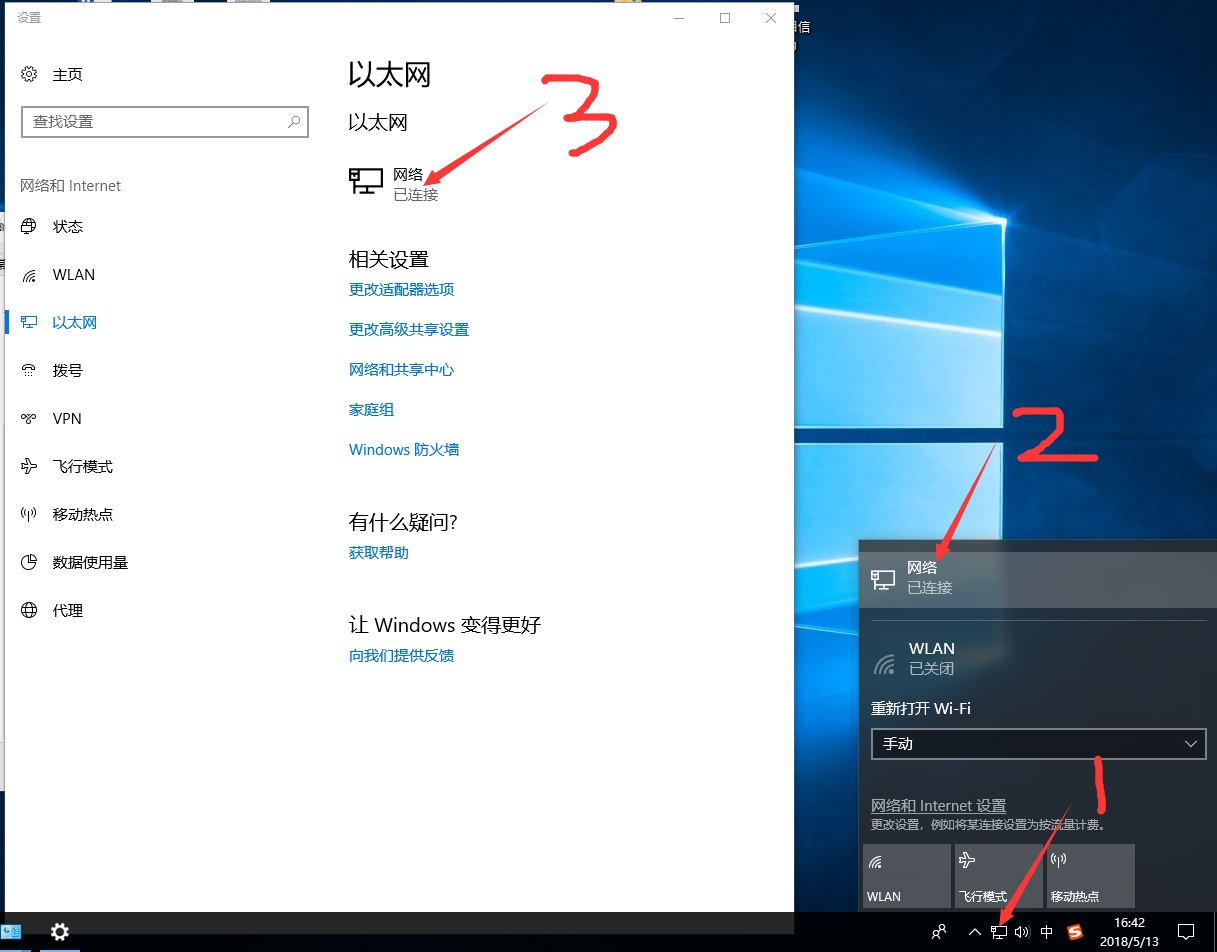
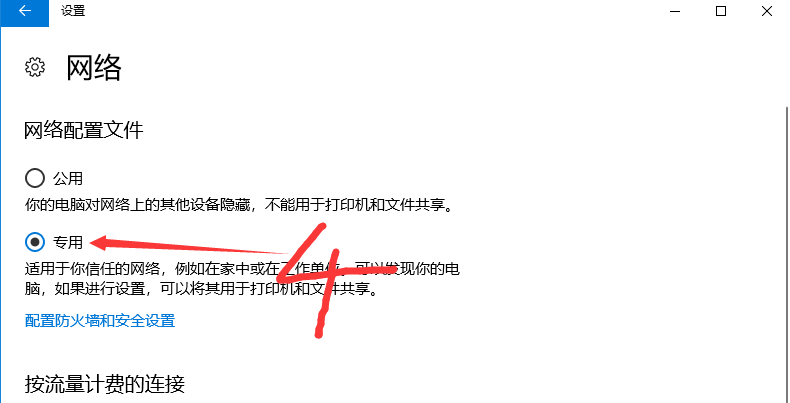
在需要局域网共享的文件夹右键菜单选择:共享—特定用户 添加everybody,按实际修改everybody权限,【读取】或者【读写】(添加guest也应该可以滴) 无需用户密码的文件夹共享搞好,打印机的共享应该就OK了。 ps.一般在专用网络启用共享,如果第一次发现网络的时候没有配置成共享的话,默认被配置成公用网络。 修改成专用方法:打开你的网络设置 ——选择你正在使用的网络——查找设备和内容——【开】
相信通过上面的设置后,大家就能成功的实现Win10打印机共享,并无障碍访问了~希望对大家有帮助。
华为交换机的基本配置,这篇内容是华为交换机的基本配置,今天我们来看下具体应用,以华为交换机为例,也是用的比较多,来看下它的具体配置,这个在实际项目中经常会遇到,实用性比较强,如果你以对vlan了解不多,那么这篇文章可以带你深入学习vlan,都有详细注释。
端口类型
在学习划分vlan前,必须要了解华为交换机的端口类型,以及他们的使用方法,因为端口的类型在实际配置中是必须会用到的,因为下面的vlan划分会用到。
1、Access类型端口
执行命令port default vlan vlan-id,将端口加入到指定的VLAN中。
Access类型端口只能属于1个VLAN,一般用于连接计算机端口;
2、Trunk类型端口
Trunk类型端口可以允许多个VLAN通过,可以接收和发送多个VLAN 报文,
3、Hybrid类型端口
– 选择执行其中一个步骤配置Hybrid端口加入VLAN的方式:Hybrid类型端口:可以允许多个VLAN通过,可以接收和发送多个VLAN 报文。
我们前面曾说到,关于vlan的划分方法有很多,项目应用中较多的方法就是基于端口划分vlan、基于mac地址划分vlan、基于ip地址划分vlan,要真正对vlan了解,必须熟悉这三次划分方法,以便于根据实际项目进行应用。
一、基于端口的vlan划分方法
这里面为了方便大家理解,直接用实例讲解更清楚。
1、组网需求
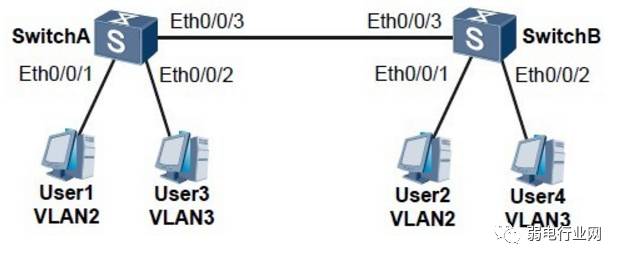
如图1所示,某企业的交换机连接有很多用户,且相同业务用户通过不同的设备接入企业网络。为了通信的安全性,也为了避免广播报文泛滥,企业希望业务相同用户之间可以互相访问,业务不同用户不能直接访问。
可以在交换机上配置基于端口划分VLAN,把业务相同的用户连接的端口划分到同一VLAN。
也就是不同VLAN的用户不能直接进行二层通信,同一VLAN内的用户可以直接互相通信。
2、配置步骤
步骤1 在SwitchA创建VLAN2和VLAN3,并将连接用户的端口分别加入VLAN。SwitchB配置与SwitchA类似,不再赘述。
[Quidway] system-view //进入配置视图
[Quidway] sysname SwitchA //给交换机命名
[SwitchA] vlan batch 2 3 //同时创建vlan2与vlan3
[SwitchA] interface ethernet 0/0/1 //进入端口0/0/1
[SwitchA-Ethernet0/0/1] port link-type access //设置端口模式为access
[SwitchA-Ethernet0/0/1] port default vlan 2 //将端口加入vlan2中
[SwitchA-Ethernet0/0/1] quit //退出
[SwitchA] interface ethernet 0/0/2 //进入端口0/0/2
[SwitchA-Ethernet0/0/2] port link-type access //端口模式为access
[SwitchA-Ethernet0/0/2] port default vlan 3 //将端口加入vlan3中
[SwitchA-Ethernet0/0/2] quit //退出
步骤2 配置SwitchA上与SwitchB连接的端口类型及通过的VLAN。SwitchB配置与SwitchA类似,不再赘述。
[SwitchA] interface ethernet 0/0/3 //进入端口0/0/3
[SwitchA-Ethernet0/0/3] port link-type trunk //设置端口模式为trunk
[SwitchA-Ethernet0/0/3] port trunk allow-pass vlan 2 3 //trunk口允许通过vlan2与vlan3的数据包
步骤3 验证配置结果将User1和User2配置在一个网段,比如192.168.100.0/24;将User3和User4配置在一个网段,比如192.168.200.0/24。
User1和User2能够互相ping通,但是均不能ping通User3和User4。User3和User4能够互相ping通,但是均不能ping通User1和User2。
二、基于MAC地址vlan划分方法
1、组网需求
某个公司的网络中,网络管理者将同一部门的员工划分到同一VLAN。为了提高部门内的信息安全,要求只有本部门员工的PC才可以访问公司网络。
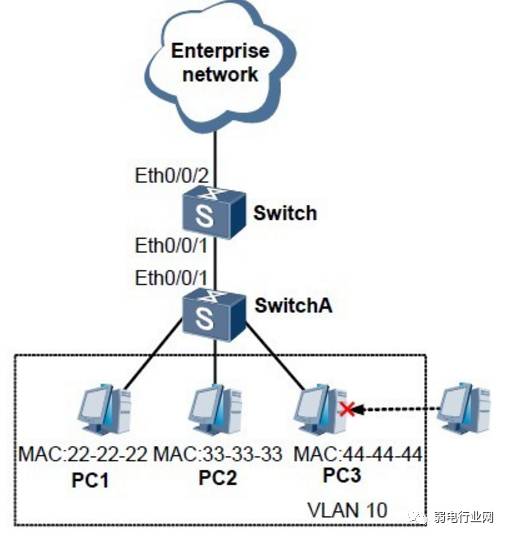
如图2所示,PC1、PC2、PC3为本部门员工的PC,要求这几台PC可以通过SwitchA、Switch访问公司网络,如换成其他PC则不能访问。可以配置基于MAC地址划分VLAN,将本部门员工PC的MAC地址与VLAN绑定,从而实现该需求。
2、操作步骤
这里面弱电君对上面重复的注释就不再解释了,和上面一样,大家也可以验证下,经过上面的理解,是否能认识下面的配置代码。
步骤1 配置Switch
# 创建VLAN
[Quidway] system-view
[Quidway] vlan batch 10 100
# 配置接口的PVID和加入VLAN
[Quidway] interface ethernet 0/0/1
[Quidway-Ethernet0/0/1] port hybrid pvid vlan 100 //将接口以加入到vlan100
[Quidway-Ethernet0/0/1] port hybrid untagged vlan 10 //untagged是指当数据离开端口时脱掉标签,指定端口允许VLAN 10的数据帧通过,且发送时不带VLAN标签
[Quidway-Ethernet0/0/1] quit #退出
[Quidway] interface ethernet 0/0/2 #进入端口0/0/2
[Quidway-Ethernet0/0/2] port hybrid tagged vlan 10 //tagged是指当数据离开端口时带着标签,指定允许VLAN 10的数据帧通过,且发送时必须带有VLAN标签
[Quidway-Ethernet0/0/2] quit
# PC的MAC地址与VLAN10关联
[Quidway] vlan 10
[Quidway-Vlan10] mac-vlan mac-address 22-22-22
//关联pc1的mac地址
[Quidway-Vlan10] mac-vlan mac-address 33-33-33
//关联pc2的mac地址
[Quidway-Vlan10] mac-vlan mac-address 44-44-44
//关联pc3的mac地址
[Quidway-Vlan10] quit
# 使能接口的基于MAC地址划分VLAN功能
[Quidway] interface ethernet 0/0/1
[Quidway-Ethernet0/0/1] mac-vlan enable
//起动端口的mac-vlan功能
[Quidway-Ethernet0/0/1] quit
三、基于IP子网的vlan划分
1、组网需求
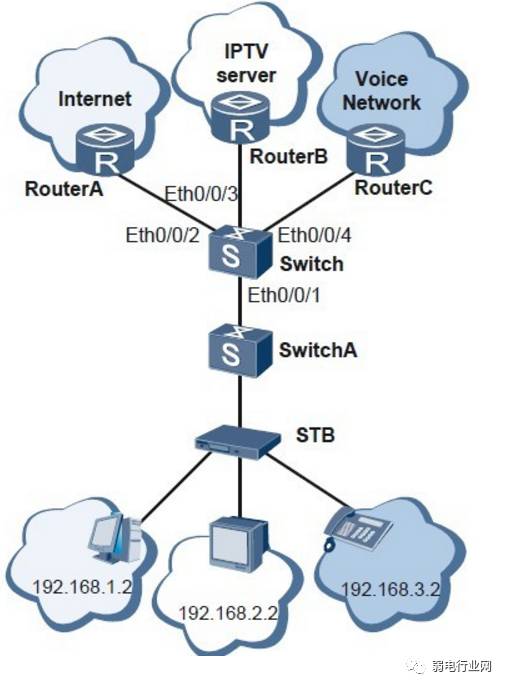
某企业拥有多种业务,如IPTV、VoIP、Internet等,每种业务使用的IP地址网段各不相同。为了便于管理,现需要将同一种类型业务划分到同一VLAN中,不同类型的业务划分到不同VLAN中。
如图3所示,Switch接收到用户报文有数据、IPTV、语音等多种业务,用户设备的IP地址网段各不相同。现需要将不同类型的业务划分到不同的VLAN中,通过不同的VLANID分流到不同的远端服务器上以实现业务互通。
这类在实际应用中是比较多的。
2、配置思路
采用如下的思路配置基于IP子网划分VLAN:
a、创建VLAN,确定每种业务所属的VLAN。
b、关联IP子网和VLAN,实现根据报文中的源IP地址或指定网段确定VLAN。
c、配置端口加入VLAN,实现基于IP子网的VLAN通过当前端口。
d、配置VLAN划分方式的优先级,确保优先选择基于IP子网划分VLAN。
e、使能基于IP子网划分VLAN。
3、操作步骤
步骤1 创建VLAN
# 在Switch上创建VLAN100、VLAN200和VLAN300。
[Quidway] system-view
[Quidway] vlan batch 100 200 300
步骤2 配置接口
# 在Switch上配置接口Eth0/0/1为Hybrid类型,并加入VLAN100、VLAN200和VLAN300。
[Quidway] interface ethernet 0/0/1
[Quidway-Ethernet0/0/1] port link-type hybrid //设置端口为hybrid模式
[Quidway-Ethernet0/0/1] port hybrid untagged vlan100 200 300 //指定端口允许VLAN 100、vlan200、vlan300的数据帧通过,且发送时不带VLAN标签
[Quidway-Ethernet0/0/1] quit
# 在Switch上配置接口Eth0/0/2加入VLAN100。
[Quidway] interface ethernet 0/0/2
[Quidway-Ethernet0/0/2] port link-type trunk
[Quidway-Ethernet0/0/2] port trunk allow-pass vlan 100 //接口0/0/2加入vlan100
[Quidway-Ethernet0/0/2] quit
# 在Switch上配置接口Eth0/0/3加入VLAN200。
[Quidway] interface ethernet 0/0/3
[Quidway-Ethernet0/0/3] port link-type trunk
[Quidway-Ethernet0/0/3] port trunk allow-pass vlan 200 //接口0/0/3加入vlan200
[Quidway-Ethernet0/0/3] quit
# 在Switch上配置接口Eth0/0/4加入VLAN300。
[Quidway] interface ethernet 0/0/4
[Quidway-Ethernet0/0/4] port link-type trunk
[Quidway-Ethernet0/0/4] port trunk allow-pass vlan 300 //接口0/0/4加入vlan300
[Quidway-Ethernet0/0/4] quit
# 在Switch上配置接口Eth0/0/1使能基于IP子网划分VLAN功能。
[Quidway] interface ethernet 0/0/1
[Quidway-Ethernet0/0/1] ip-subnet-vlan enable
[Quidway-Ethernet0/0/1] quit
步骤3 配置基于IP子网划分VLAN
# 在Switch上配置VLAN100与IP地址192.168.1.2/24关联,优先级为2。
[Quidway] vlan 100
[Quidway-vlan100] ip-subnet-vlan 100 ip 192.168.1.2 24 priority 2
[Quidway-vlan100] quit
# 在Switch上配置VLAN200与IP地址192.168.2.2/24关联,优先级为3。
[Quidway] vlan 200
[Quidway-vlan200] ip-subnet-vlan 200 ip 192.168.2.2 24 priority 3
[Quidway-vlan200] quit
# 在Switch上配置VLAN300与IP地址192.168.3.2/24关联,优先级为4。
[Quidway] vlan 300
[Quidway-vlan300] ip-subnet-vlan 300 ip 192.168.3.2 24 priority 4
[Quidway-vlan300] quit
步骤4 验证配置结果
在Switch上执行以下命令,显示信息如下:
[Quidway] display ip-subnet-vlan vlan all
—————————————————————-
Vlan Index IpAddress SubnetMask Priority
—————————————————————-
100 1 192.168.1.2 255.255.255.0 2
200 1 192.168.2.2 255.255.255.0 3
300 1 192.168.3.2 255.255.255.0 4
—————————————————————-
ip-subnet-vlan count: 3 total count: 3
即为组网配置成功。
微软surface win10无限重启解决方法
1、制作USB启动盘,并从u盘启动
将微软原版Windows10镜像写入U盘后即可得到带有恢复环境的USB启动盘。
2、进入恢复环境进行修复
从u盘启动后,你会看到下面的画面:
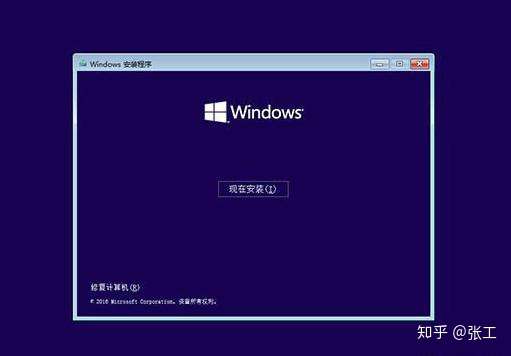
点击左下角的“修复计算机”
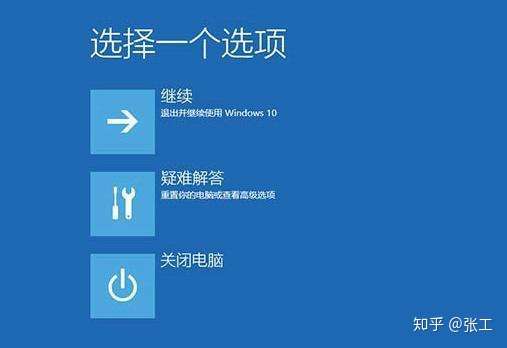
选择“疑难解答”

选择“高级选项”

选择“命令提示符”
之后会打开命令提示符,如果提示你输入密码,请输入自己的Windows登录密码。
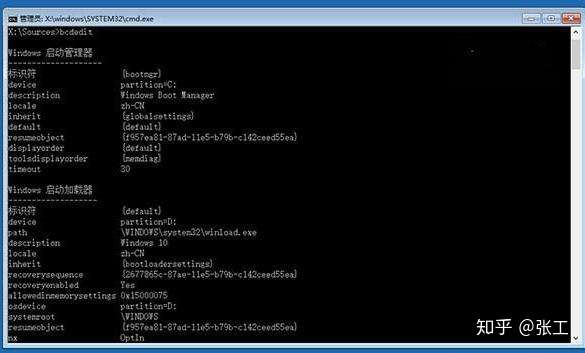
在命令提示符中输入bcdedit回车,你会看到上图所示的结果,找到名为resumeobject的条目,记录下后面的一长串字符(即GUID)。
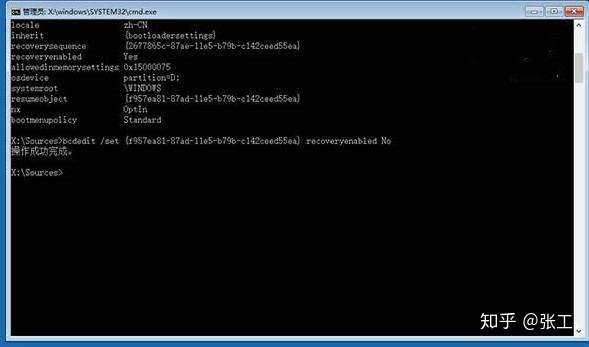
接着输入bcdedit /set {GUID} recoveryenabled No回车运行,运行该命令后就会暂时禁用系统的自动启动修复功能,其中的{GUID}即为上一步中记录的字符。
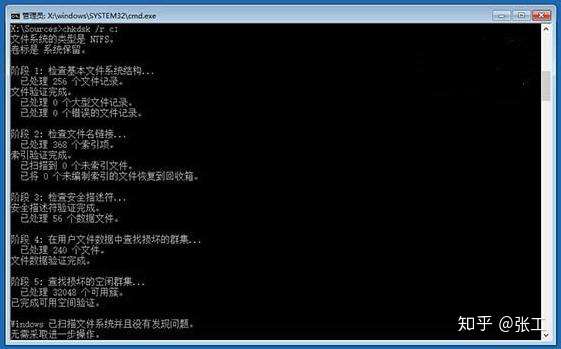
最后输入chkdsk /r c:回车,系统会自动检查文件系统错误。检查完成之后再重启电脑,一般情况下即可恢复正常。不过在重启之前,建议再执行一下系统文件修复命令,以修复系统中可能已损坏的文件。方法:
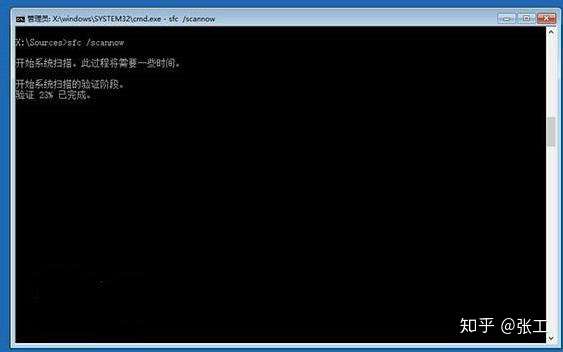
输入sfc /scannow回车,之后会开始系统文件的扫描验证。这需要一点时间,请保持耐心。
修复完成之后重启即可。
ls 列出当前文件目录下的文件(只显示文件名)pwd 显示当前操作的路径cd 跳转路径ls -a 可以把隐藏的文件显示出来 ,另外,创建隐藏文件的命令是 touch.123.txt 就是在文件名字前加了一个“点”ls -h可以显示所创文件的大小,会进行一个自动的统计ls -l以链表的形式显示文件信息,一行输出,其实是详细了ls -a -l -h综合上面是三种方式,以链表的形式输出ls -alh和 ls -a -l -h 的作用是一样的clear是清空屏幕touch创建一个文件mkdir创建一个文件夹rm删除文件或一个文件夹,值得注意的是,在删除文件夹的时候,要写rm 文件夹名 -r。其中-r的意思是递归。不管文件夹是不是为空都会删除!!rmdir删除文件夹(文件夹是空才能删除)rm / -rf从根目录开始删除(万恶的命令啊~~~)gedit使用linux默认编辑器对文件进行编辑cat 可以查看文件的全部内容(不能编辑)还可以同时查看两个文件或多个文件的内容,例如:cat 1.txt 2.txt
而且cat可以和 重定向>或>>连用,例如:
cat 1.txt 2.txt > xxx.txt
这样的话就能实现吧1.txt 和2.txt 的内容 写到新建的xxx.txt 的文件中去。也就是实现了文件的合并
more可以查看文件的内容(以百分比显示),如果想要继续查看下面的内容,则可以按下f或b键进行翻页查看。Tab 键可以自动补全b 可以往回走(翻屏)f 可以向下走(翻屏)q如果没有显示’命令’时,就要按q键进行退出操作ctrl + shift + t在同一个终端中新建一个标签alt + 1切换到第一个标签的终端,依次类推上箭头 和下箭头就可以找到上一个或者下一个命令,这样就可以实现对于命令的快速使用,而不需要再重新写命令。命令的名字 + --help 可以显示这个命令的帮助信息,或者是用man + 命令的名字也可以达到相同的效果,举个栗子:我们要查看ls的用法,就可以使用下面的两种方法来实现:ls --help或 man ls。*:可以代替多位(0-n)字符,进行模糊查询操作,例如 在目录下有文件 123.txt 234.txt 245.txt 134.txt ls 2* 执行这个命令之后就会筛选出来文件 234.txt 245.txt ,也就是说把以2开头的文件进行筛选。?:可以代替一位字符,进行模糊查询操作,例如:在目录下有文件 23.txt 234.txt 执行ls 2?命令,则只会显示23.txt。同理如果执行ls 2??,则此时显示234.txt。[]可以指定模糊查询的范围。例如ls 1[23]3则此时只会显示123.txt []这个通配符 只占一位 。当然[]里面也可以写[1-4]则这时表示 中括号中的值可以在1,2,3,4 中选,只要存在一个,就可以。对于重定向而言,主要是是用到>和 >>这两个符号。下面举个例子:假如我们已经在目录下创建好了 ers.txt sda.txt 123.txt 三个文件了
ls
ers.txt sda.txt 123.txt
ls > xxx.txt
ls
ers.txt sda.txt 123.txt xxx.txt
gedit xxx.txt
-----------------------------------
下面是xxx.txt 显示的内容
-----------------------------------
ers.txt sda.txt 123.txt xxx.txt
通过上面的代码,可以得出关于重定向的几个小作用
1.当重定向文件是,会自动创建一个文件 在本例中 自动生成了 xxx.txt文件。
2.重定向会把刚刚显示的信息(包括生成的xxx.txt ) 写 到 刚刚自动生成的 “重定向文件中去”。在本例中 通过 gedit 命令可以看到 ers.txt sda.txt 123.txt xxx.txt这样的结果。
ls -alh >> xxx.txt
ls
ers.txt sda.txt 123.txt xxx.txt
gedit xxx.txt
-----------------------------------
下面是xxx.txt 显示的内容
-----------------------------------
ers.txt sda.txt 123.txt xxx.txt
xxx.txt
{此处是ls -alh 所显示的信息}
通过上面的一段代码,可以知道>>可以追加并写入,但是如果只有> 的话,会把原来的删除,只写最新的ls
;把两个命令进行分开。|这个符号类似于“管道”的概念,例如:ls -alh | more这样就可以实现分屏显示要显示的内容了。.\A这个命令表示在当前目录先的A的文件夹下的目录下。也就是说一个点可以表示的 绝对路径。而 ..则表示是返回上一层的路径 例如:在目录 \home\python\A 下,使用命令 cd .. 则执行的结果就是返回上一次的目录,也就是到了python 的目录下。当然了之有.和..。不存在三个或者是多个点。在本例要想返回到home 文件夹下,命令应该这样写:cd ..\..这样就到了home 的文件夹下面,当然了也可以用绝对路径。cd -是快速返还上一次的路径,且只能执行一次。cd ~是快速返回到家目录。在我的机子上 就是\home\yaojianlong\Ctrl + C就会跳转到下一行。我们就可以重新写命令了。mkdir /A/B/C/D -p
就完成了上述嵌套文件的创建。-p 命令执行之后,就会对与依赖文件先进行创建。
注意
1.
ls -a -l -h和ls -l -a -h实现的效果是一样的,或者说这个是和顺序无关的,例如ls -alh和ls -hal实现的效果也是一样的;2.不要忘记了ls 和 -alh 之间的空格。
Linux 链接文件类似于Windows下的快捷方式。链接文件分为软链接和硬链接。
ln 源文件 链接文件
ln -s 源文件 链接文件
如果 没有-s选项代表建立以个硬链接文件,两个文件占用相同大小的磁盘空间,即使删除了源文件,链接文件还是存在,所以-s 选项是更常见的形式。
注意:如果软连接和源文件不在同一个目录。源文件要使用绝对路径,不能使用相对路径。软链接相当于在windows系统下‘快捷方式’而硬链接在相当于是文件的另外一个名字,在linux下,可以看成是有多个名字的,对于新建的硬链接就相当于是文件的另外一个名字,如果说,这个文件只要是有一个’名字’存在的话,就可以真是的存在
grep "ntsd" xxx.txt
上面的代码的意思就是在xxx.txt 文件中查找 含有ntsd这几个字母的字段。
如果在选项中加入 -n则表示的是 查找 字段并把该字段在文件中的位置(行号)显示出来。命令如下:
grep -n "ntsd" xxx.txt
如果在选项中加入 -v则表示的是 查找字段并把不包含该字段的其余字段显示,命令如下:(显示不包含该字段的信息)
grep -v "ntsd" xxx.txt
如果想要在文件中查找以 ntsd 字段开头的字段 命令如下:(显示不包含该字段的信息)
grep "^ntsd" xxx.txt
如果想要在文件中查找以 ntsd 字段结尾的字段 命令如下:(显示不包含该字段的信息)
grep "ntsd$" xxx.txt
mv重命名文件(或者文件夹)/移动(剪切并且粘贴)mv 1.txt 111.txt//把1.txt 重命名为111.txt
mv 111.txt laowang/ //把111.txt 移动到laowang 文件夹中
cp 复制文件/文件夹(并且粘贴)cp 2.txt A //复制 2.txt 文件到 A 文件夹中
cp A laowang/ -r //只要是文件夹不能操作,加一个-r 就可以了。
find 命令可以查找文件,和grep 不同的是,grep 是查找文件里面的内容。这一点一定不要搞混了。find 有name 和 size 选项,下面举个简单的例子来说明这个命令的用法。find /tmp -name ts //查找tmp目录下的 名字为 ts 的文件
find /tmp -name "*ts*" //查找tmp目录下的文件名中含有 ts 的文件
find /tmp -size 2M //查找tmp 目录下 文件大小为2M的文件
tar -cvf test.tar *.py 打包,把所有的.py文件进行打包(大小不变,并没有压缩)tar -xvf test.tar 解包压缩格式(一)
tar -zcvd xxx.tar.gz *.py 压缩所有.py文件tar -zxvd xxx.tar.gz解压.gz 压缩包这种方法压缩的文件比较小哦
压缩格式(二)
tar -cvf yyy.tar.bz2 *.py 压缩包为.bz2 压缩格式tar -jcvf yyy.tar.bz2 解压上面的包(不是面包哦)这种方法压缩的文件比较大哦(虽然是废话,但是我还是要说~哼)
cal (显示日历的,不要写成call,一天天的给xxx疯狂打call)举个栗子:查看2018年的日历
cal -y 2018
date 查看当前的时间(很具体的哦)。date "+%Y年%m%d"在这个小的命令中呢,显示的结果是 2018年1月3日 也就是说,在date命令后加上了双引号了之后呢,就可以根据自己的格式来了,还有需要注意的一点就是,在这个小的命令中%Y和%y显示的效果是不一样的,小y只是显示年份的最后两位,例如2018 如果用小y的话就只是显示“18”了哦。ps -aux显示现在的所有进程top 命令可以显示当前地电脑显示进程,但是没有全部显示出来htop 显示进程(很详细,很牛x)kill 例如:kill 9822 则把id为9822 的进程杀死,但是如果杀不死呢1就是不死呢!woc!竟然不死,不要紧,用 kill -9 9822 强制杀死,就这样,他挂掉了。这个id 可以用ps -aux 进行查看。reboot 重新启动shutdown -h now立刻关机;shutdown +10 10 min后关机;shutdown 20:2020:20准时关机df用来查看系统总硬盘的使用情况du用来查看当前路径的使用情况ifconfig用来显示当前电脑上的网络信息和设置网络pingping 加一个ip看接通情况。sudo useradd root123 -m 创建一个新的用户(root 是自定的用户名),其中-m的意思是创建一个用户之后,同时在home 下创建一个和用户名称一样的目录文件夹sudo userdel root123 删除名字为root123的用户su root切换到root123用户中(此时还是在原来用户的目录下)。如果说su - root 切换到root用户下,并且同时切换到root123的家目录下。sudo passwd root123 设置root123 用户的密码,或者更改用户的密码whoami 查看登陆当前操作用户的名字并显示who 查看所有登陆用户的名字并显示exit 退出当前用户ssh root@172.100.2.2 远程连接名称为root的用户(用户ip为172.100.2.2),window是没有这个命令的sudo -s进入进入root超级管理员界面,需要注意的一点是,不要用su root这样你是进不去的(限于linux),不信你试试哈(你是不会知道密码的hahahah~)sudo groupadd创建用户组sudo delgroup删除用户组cat /etc/passwd查看用户是否创建成功cat /etc/group查看用户组是否创建成功添加sudo权限给普通用户给普通用户(xxxx)添加sudo权限。注意的一点是,在linux中,如果创建了一个新的用户组,默认的是没有sudo权限的,也就是说在新建的用户xxxx中是无法使用 sudo -s这个命令的。所以如果非要使用这个命令的话,就需要给他sudo权限。下面的是完整的命令:
sudo usermod -a -G sudo xxxx

sudo usermod -a -G adm xxxx
chgrp xxxx 1.py更改当前用户组的 1.py 文件的 用户组权限为xxxxchown xxxx 1.py更改当前用户的 1.py 文件的用户权限为 xxxx举一个简单的小栗子吧~
现在有 1.py 2.py 3.py 三个文件,修改1.py 用户权限为 “可读可写可执行”则:
chmod u=rwx 1.py
执行结果:
-rwxrw-r-- 1 python python 0 1月 4 20:29 1.py*
从上面的例子中我们可以看出,-rwxrw-r-- 用户的权限已经改成了rwx;用户组的权限为rw-;其他用户的权限为r--。通过这个例子,同样的我们可以用chmon g=rwx chmod o=r等命令进行权限的更改。也可硬一次性的改多个属性,例如:
chmod u=rwx,g=r,o=wx 2.py //可以用逗号进行分割
上面介绍的方法是字母法,现在来介绍数字法:
r 代表读(read),w 代表写(write),x 代表执行(execute)
读,权限是二进制的100,十进制是4;
写,权限是二进制的010,十进制是2;
执行,权限是二进制的001,十进制是1;
具备多个权限,就把相应的 4、2、1 相加就可以了:
若要 rwx 则 4+2+1=7
若要 rw- 则 4+2=6
若要 r-x 则 4+1=5
若要 r– 则 =4
若要 -wx 则 2+1=3
若要 -w- 则 =2
若要 –x 则 =1
若要 — 则 =0
也就是说,下面的代码是等价的:
chmod u=x,g=wx,o=rwx 2.py

chmod 137 2.py
先不写啦
小总结一下常用的Linux命令。
MIUI查看电量的方法
注:转自小米社区
最新查看电池健康度方法
1.在拨号盘输入*#*#284#*#*抓取log。
2.抓取完成后,请解压缩包(bugreport-tucana-QKQ1),解压完成后打开文件夹里面还有一个压缩包在进行解压。
3.解压完成后,打开与上一个压缩包同名的TXT
4.打开后搜索关键词healthd,搜索到后里面有一个fc的值,就是你的学习后的电量。
5.针对充电慢的问题,可以在该TXT搜索关键词thermal level就可以了,上面是在healthd一行中找不到tl就找上面的这个词,
注意事项:fc是学习后的电池容量,可做为真实电池容量计算健康度,健康度计算公式:学习后电量除以手机原来的容量等于健康度,tl为0时,充电速度是正常的,如果超过0就说明充电速度被限制了,那么请用户不要边冲边玩和亮屏充电,当然环境造成的发热是无法抵御的,总之一句话只要不发热随便你怎么玩,亮屏充电也没问题。
虚拟机安装系统系统:Centos 8.3 http://mirrors.aliyun.com/centos/8.3.2011/isos/x86_64/CentOS-8.3.2011-x86_64-dvd1.iso
1、安装 MariaDB
[root@seahub ~]##使用yum安装Mariadb
[root@seahub ~]# yum install -y mariadb mariadb-server
配置MariaDB
[root@snipeit ~]##初始化数据库
[root@snipeit ~]# service mariadb start
Redirecting to /bin/systemctl start mariadb.service
[root@snipeit ~]# mysql_secure_installation
NOTE: RUNNING ALL PARTS OF THIS SCRIPT IS RECOMMENDED FOR ALL MariaDB
SERVERS IN PRODUCTION USE! PLEASE READ EACH STEP CAREFULLY!
In order to log into MariaDB to secure it, we’ll need the current
password for the root user. If you’ve just installed MariaDB, and
you haven’t set the root password yet, the password will be blank,
so you should just press enter here.
Enter current password for root (enter for none): #直接回车
OK, successfully used password, moving on…
Setting the root password ensures that nobody can log into the MariaDB
root user without the proper authorisation.
Set root password? [Y/n] y #是否设置密码,当然是
New password: PassW0rd #数据库管理密码
Re-enter new password: PassW0rd #确认密码
Password updated successfully!
Reloading privilege tables..
… Success!
By default, a MariaDB installation has an anonymous user, allowing anyone
to log into MariaDB without having to have a user account created for
them. This is intended only for testing, and to make the installation
go a bit smoother. You should remove them before moving into a
production environment.
Remove anonymous users? [Y/n] y
… Success!
Normally, root should only be allowed to connect from ‘localhost’. This
ensures that someone cannot guess at the root password from the network.
Disallow root login remotely? [Y/n] y
… Success!
By default, MariaDB comes with a database named ‘test’ that anyone can
access. This is also intended only for testing, and should be removed
before moving into a production environment.
Remove test database and access to it? [Y/n] y
Thanks for using MariaDB!
[root@snipeit ~]##登陆数据库,登陆成功则表示安装完成
[root@snipeit ~]# mysql -u root -p
Enter password:
MariaDB [(none)]> exit
Bye
2、安装依赖环境
yum install tree -y #这个是结构目录
yum install wget –y #组件
yum install vim –y #组件
yum -y install gcc gcc-c++ #必装
yum install python3-devel -y #必装
yum install mariadb-devel -y #必装
yum install python3 python3-setuptools python3-pip python3-ldap -y #必装
pip3 install Pillow pylibmc captcha jinja2 sqlalchemy #必装,一项一项来
pip3 install django-pylibmc django-simple-captcha #必装,一项一项来
pip3 install psd-tools #必装,一项一项来
pip3 install ConfigParser #必装,一项一项来
pip3 install future #必装,一项一项来
pip3 install mysqlclient #必装,一项一项来
3、 环境部署完成后,有条件的做个整机备份(快照)
[root@seahub ~]# cd /opt/ #进入opt目录
[root@seahub ~]# ls
[root@seahub ~]# mkdir seafile #创建安装目录
[root@seahub ~]# wget https://seafile-downloads.oss-cn-shanghai.aliyuncs.com/seafile-server_8.0.2_x86-64.tar.gz #下载seafile安装包
[root@seahub ~]# ls
seafile seafile-server_8.0.2_x86-64.tar.gz
[root@seahub ~]# cp seafile-server_8.0.2_x86-64.tar.gz seafile #复制一份
[root@seahub ~]# ls
seafile seafile-server_8.0.2_x86-64.tar.gz
[root@seahub ~]# cd seafile/
[root@seahub ~]# ls
seafile-server_8.0.2_x86-64.tar.gz
[root@seahub ~]# tar -xzf seafile-server_8.0.2_x86-64.tar.gz #解压安装包
[root@seahub ~]# ls
seafile-server-8.0.2 seafile-server_8.0.2_x86-64.tar.gz
[root@seahub ~]# mkdir installd
[root@seahub ~]# mv seafile-server_8.0.2_x86-64.tar.gz installd/ #将压缩包归档,本人强迫症,不需要的略过…
4、安装包下载完成,目录结构准备ok,EMM…有条件的做备份(快照)
[root@seahub ~]#cd seafile-server-8.0.2/ #进去安装目录
[root@seahub ~]#./setup-seafile-mysql.sh #开始安装
This script will guide you to setup your seafile server using MySQL.
Make sure you have read seafile server manual at
https://download.seafile.com/published/seafile-manual/home.md
What is the name of the server? It will be displayed on the client.
3 – 15 letters or digits
[ server name ] seahub #服务器名,随便输也可以
What is the ip or domain of the server?
For example: www.mycompany.com, 192.168.1.101
[ This server’s ip or domain ] 192.168.1.3 #IP地址或域名
Which port do you want to use for the seafile fileserver?
[1] Create new ccnet/seafile/seahub databases
[2] Use existing ccnet/seafile/seahub databases
[ 1 or 2 ] 1 #选择1
What is the host of mysql server?
[ default “localhost” ] #数据库地址,无特殊需求,默认
What is the port of mysql server?
[ default “3306” ] #数据库端口,无特殊需求默认
What is the password of the mysql root user?
[ root password ]PassW0rd #上面设置的数据库管理密码
verifying password of user root … done
Enter the name for mysql user of seafile. It would be created if not exists.
[ default “seafile” ] #默认,直接回车
Enter the password for mysql user “seafile”:
[ password for seafile ] #默认,直接回车
Enter the database name for ccnet-server:
[ default “ccnet-db” ] #默认,直接回车
Enter the database name for seafile-server:
[ default “seafile-db” ] #默认,直接回车
Enter the database name for seahub:
server name:            seahub
server ip/domain:       192.168.1.3
seafile data dir:       /opt/seafile/seafile-data
fileserver port:        8082
database:               create new
ccnet database:         ccnet-db
seafile database:       seafile-db
seahub database: seahub-dbGenerating ccnet configuration …
Generating seafile configuration …
done
run seafile server: ./seafile.sh { start | stop | restart }
port of seafile fileserver: 8082
port of seahub: 8000
When problems occur, Refer to
https://download.seafile.com/published/seafile-manual/home.md
for information.
[root@seahub ~]# cd /opt/seafile/
[root@seahub ~]#tree -L 2 #查看一下目录结构,看不看都行,本人强迫症
.
├── ccnet
├── conf
│ ├── ccnet.conf
│ ├── gunicorn.conf.py
│ ├── seafdav.conf
│ ├── seafile.conf
│ └── seahub_settings.py
├── installd
│ └── seafile-server_8.0.2_x86-64.tar.gz
├── seafile-data
│ └── library-template
├── seafile-server-8.0.2
│ ├── check_init_admin.py
│ ├── reset-admin.sh
│ ├── runtime
│ ├── seaf-fsck.sh
│ ├── seaf-fuse.sh
│ ├── seaf-gc.sh
│ ├── seafile
│ ├── seafile.sh
│ ├── seahub
│ ├── seahub.sh
│ ├── setup-seafile-mysql.py
│ ├── setup-seafile-mysql.sh
│ ├── setup-seafile.sh
│ ├── sql
│ └── upgrade
├── seafile-server-latest -> seafile-server-8.0.2
└── seahub-data
└── avatars
14 directories, 16 files
[root@seahub ~]#/opt/seafile/seafile-server-latest/./seafile.sh start
[root@seahub ~]#/opt/seafile/seafile-server-latest/./seahub.sh start #第一次需要设置邮箱和管理员密码,比较简单,不做详细介绍
[root@seahub ~]#vim /etc/rc.d/rc.local #按i键,插入一下内容,ESC:wq保存
/opt/seafile/seafile-server-latest/./seafile.sh start
/opt/seafile/seafile-server-latest/./seahub.sh start
[root@seahub ~]#chmod +x /etc/rc.d/rc.local
[root@seahub ~]#yum install nginx #安装Nginx
[root@seahub ~]# vi /etc/nginx/nginx.conf #修改nginx配置文件,修改后的如下
user nginx;
worker_processes auto;
error_log /var/log/nginx/error.log;
pid /run/nginx.pid;
include /usr/share/nginx/modules/*.conf;
events {
worker_connections 1024;
}
http {
log_format main ‘$remote_addr – $remote_user [$time_local] “$request” ‘
‘$status $body_bytes_sent “$http_referer” ‘
‘”$http_user_agent” “$http_x_forwarded_for”‘;
access_log  /var/log/nginx/access.log  main;

sendfile            on;
tcp_nopush          on;
tcp_nodelay         on;
keepalive_timeout   65;
types_hash_max_size 2048;

include             /etc/nginx/mime.types;
default_type        application/octet-stream;

# Load modular configuration files from the /etc/nginx/conf.d directory.
# See http://nginx.org/en/docs/ngx_core_module.html#include
# for more information.
include /etc/nginx/conf.d/*.conf;
server {
listen 80;
server_name 192.168.1.3;
proxy_set_header X-Forwarded-For $remote_addr;

location / {
     proxy_pass         http://127.0.0.1:8000;
     proxy_set_header   Host $host;
     proxy_set_header   X-Real-IP $remote_addr;
     proxy_set_header   X-Forwarded-For $proxy_add_x_forwarded_for;
     proxy_set_header   X-Forwarded-Host $server_name;
     proxy_read_timeout  1200s;

     # used for view/edit office file via Office Online Server
     client_max_body_size 0;

     access_log      /var/log/nginx/seahub.access.log;
     error_log       /var/log/nginx/seahub.error.log;
}
location /seafhttp {
    rewrite ^/seafhttp(.*)$ $1 break;
    proxy_pass http://127.0.0.1:8082;
    client_max_body_size 0;
    proxy_set_header   X-Forwarded-For $proxy_add_x_forwarded_for;

    proxy_connect_timeout  36000s;
    proxy_read_timeout  36000s;
    proxy_send_timeout  36000s;

    send_timeout  36000s;
}
location /media {
    root /opt/seafile/seafile-server-latest/seahub;
}
}
#
#
#
#
#
#
}
[root@seahub ~]# systemctl enable nginx #配置nginx开机启动
[root@seahub ~]# firewall-cmd –permanent –zone=public –add-port=80/tcp #防火墙端口开放,Emm…这个差点忘了
[root@seahub ~]# firewall-cmd –permanent –zone=public –add-port=8000/tcp
[root@seahub ~]# firewall-cmd –permanent –zone=public –add-port=8082/tcp
[root@seahub ~]# systemctl restart firewalld.service #重启防火墙
[root@seahub ~]# setenforce 0 #临时关闭selinu
[root@seahub ~]# vi /etc/sysconfig/selinux #永久关闭selinu
#SELINUX=enforcing 改为 SELINUX=disabled #永久关闭selinux

ibrar
重要说明:
如果交换机端口配置为TRUNK,默认允许所有本交换机已创建VLAN的报文通过,全网TRUNK互联的情况下,整网的广播组播未知名单播都可能会泛洪到交换机上,导致端口、链路拥塞、大量协议报文(例如ARP)送CPU处理导致设备管理面出现异常(无法管理,CLI响应慢等现象),所以在项目实施中,规范性要求端口务必配置TRUNK裁减,只允许放通的VLAN报文通过。
1. 交换机access口配置
将交换机的10号口配置为access口,并且属于vlan100
Ruijie>enable
Ruijie(config)#interface gigabitEthernet 1/10
Ruijie(config-if-GigabitEthernet 1/10)#switchport access vlan 100
Ruijie(config-if-GigabitEthernet 1/10)#end
Ruijie#write
说明:
交换机如果没有配置,那么默认所有端口都是access口。如果端口被配置为trunk口,需要改为access口,需要先在接口下敲switchport mode access,否则不生效,例如原来的trunk口配置改为access口,属于access vlan 100,命令如下:
Ruijie#show run interface gigabitEthernet 1/10 ——>查看配置
Building configuration…
Current configuration : 56 bytes
interface GigabitEthernet 1/10
switchport mode trunk
Ruijie#configure terminal
Ruijie(config)#interface gigabitEthernet 1/10
Ruijie(config-if-GigabitEthernet 1/10)#switchport mode access ——>设置为access模式
Ruijie(config-if-GigabitEthernet 1/10)#switchport access vlan 100
Ruijie(config-if-GigabitEthernet 1/10)#end
查看配置
Ruijie(config-if-GigabitEthernet 1/10)#show vlan
VLAN Name Status Ports
—- ——————————– ——— ———————————–
1 VLAN0001 STATIC Gi1/1, Gi1/2, Gi1/3, Gi1/4
Gi1/5, Gi1/6, Gi1/7, Gi1/8
Gi1/9, Gi1/13, Gi1/14, Gi1/15
Gi1/16, Gi1/17, Gi1/18, Gi1/19
Gi1/20, Gi1/21, Gi1/22, Gi1/23
Gi1/24, Gi1/25, Gi1/26, Gi1/27
Gi1/28, Gi1/29, Gi1/30, Gi1/31
Gi1/32, Gi1/33, Gi1/34, Gi1/35
Gi1/36, Gi1/37, Gi1/38, Gi1/39
Gi1/40, Gi1/41, Gi1/42, Gi1/43
Gi1/44, Te1/45, Te1/46, Te1/47
Te1/48, Gi4/1, Gi4/2, Gi4/3
100 VLAN0100 STATIC Gi1/1, Gi1/10, Te1/45, Te1/46
Te1/47
2. 交换机TRUNK口配置
将交换机的45号口配置为trunk口
Ruijie(config)#interface TenGigabitEthernet 1/45
Ruijie(config-if-TenGigabitEthernet 1/45)#switchport mode trunk
Ruijie(config-if-TenGigabitEthernet 1/45)#end
查看配置
Ruijie#show interfaces trunk
Interface Native VLAN VLAN lists
——————————– ———– ———————-
TenGigabitEthernet 1/45 1 ALL ——>native vlan是1,ALL表示允许所有的vlan通过
TenGigabitEthernet 1/46 1 ALL
TenGigabitEthernet 1/47 1 ALL
3. TRUNK口VLAN裁剪(必配)
交换机的1号口配置为trunk口,并且只允许vlan 5、vlan 10、vlan20-30通过,其余vlan不允许通过
Ruijie#configure terminal
Ruijie(config)#interface gigabitEthernet 1/1
Ruijie(config-if-GigabitEthernet 1/1)#switchport mode trunk
Ruijie(config-if-GigabitEthernet 1/1)#switchport trunk allowed vlan remove 1-4,6-9,11-19,31-4094 ——>交换机默认允许所有本地已创建的vlan通过,如果只需要配置只允许相应vlan通过,需要把不允许通过的vlan给裁剪掉
Ruijie(config-if-GigabitEthernet 1/1)#end
Ruijie#wr
一、可以正常进入设备运行模式的情况下:
1、进入特权模式
Ruijie>enable ——>进入特权模式
2、查看设备flash当前文件列表
Ruijie#dir ——->查看flash当前文件列表
Directory of flash:/
Mode Link Size MTime Name
———– —- ———– ————————— —————
1 2840 2016-10-23 17:05:09 config.text ——->保存配置的文件名”config.text“
<DIR> 1 0 1970-01-01 00:00:00 dev/
<DIR> 2 0 2007-01-01 16:37:59 mnt/
1 8 2016-10-14 14:54:17 priority.dat
<DIR> 0 0 1970-01-01 00:00:00 proc/
<DIR> 1 0 2016-10-12 09:49:12 ram/
1 13138784 2007-01-01 16:38:17 rgos.bin
<DIR> 2 0 2016-10-12 09:49:55 tmp/
<DIR> 4 0 2007-01-01 16:40:06 web/
1 5845952 2007-01-01 16:40:05 web_management_pack.upd
————————————————————————
3 Files (Total size 18984744 Bytes), 6 Directories.
Total 132120576 bytes (126MB) in this device, 108597248 bytes (103MB) available.
3、将配置文件“config.text”删除
Ruijie#delete config.text —–>删除配置文件“config.text”
Are you sure you want to delete “config.text”? [No/yes]y
File “config.text” is deleted.
部分设备的命令如下:
Ruijie#delete flash:/config.text —–>删除配置文件“config.text”
Are you sure you want to delete “/config.text”? [No/yes]y
File “/config.text” is deleted.
4、重启设备,重启后设备恢复出厂设置:
Ruijie#reload —–>重启交换机
Proceed with reload? [no]y