华为交换机的基本配置,这篇内容是华为交换机的基本配置,今天我们来看下具体应用,以华为交换机为例,也是用的比较多,来看下它的具体配置,这个在实际项目中经常会遇到,实用性比较强,如果你以对vlan了解不多,那么这篇文章可以带你深入学习vlan,都有详细注释。
端口类型
在学习划分vlan前,必须要了解华为交换机的端口类型,以及他们的使用方法,因为端口的类型在实际配置中是必须会用到的,因为下面的vlan划分会用到。
1、Access类型端口
执行命令port default vlan vlan-id,将端口加入到指定的VLAN中。
Access类型端口只能属于1个VLAN,一般用于连接计算机端口;
2、Trunk类型端口
Trunk类型端口可以允许多个VLAN通过,可以接收和发送多个VLAN 报文,
3、Hybrid类型端口
– 选择执行其中一个步骤配置Hybrid端口加入VLAN的方式:Hybrid类型端口:可以允许多个VLAN通过,可以接收和发送多个VLAN 报文。
我们前面曾说到,关于vlan的划分方法有很多,项目应用中较多的方法就是基于端口划分vlan、基于mac地址划分vlan、基于ip地址划分vlan,要真正对vlan了解,必须熟悉这三次划分方法,以便于根据实际项目进行应用。
一、基于端口的vlan划分方法
这里面为了方便大家理解,直接用实例讲解更清楚。
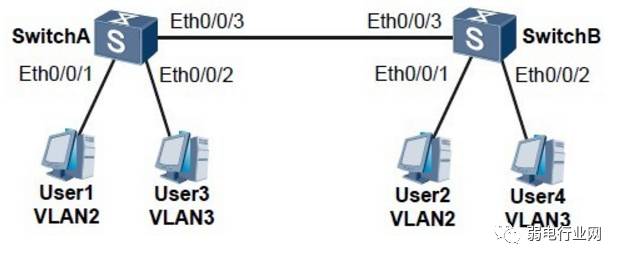
1、组网需求
如图1所示,某企业的交换机连接有很多用户,且相同业务用户通过不同的设备接入企业网络。为了通信的安全性,也为了避免广播报文泛滥,企业希望业务相同用户之间可以互相访问,业务不同用户不能直接访问。
可以在交换机上配置基于端口划分VLAN,把业务相同的用户连接的端口划分到同一VLAN。
也就是不同VLAN的用户不能直接进行二层通信,同一VLAN内的用户可以直接互相通信。
2、配置步骤
步骤1 在SwitchA创建VLAN2和VLAN3,并将连接用户的端口分别加入VLAN。SwitchB配置与SwitchA类似,不再赘述。
[Quidway] system-view //进入配置视图
[Quidway] sysname SwitchA //给交换机命名
[SwitchA] vlan batch 2 3 //同时创建vlan2与vlan3
[SwitchA] interface ethernet 0/0/1 //进入端口0/0/1
[SwitchA-Ethernet0/0/1] port link-type access //设置端口模式为access
[SwitchA-Ethernet0/0/1] port default vlan 2 //将端口加入vlan2中
[SwitchA-Ethernet0/0/1] quit //退出
[SwitchA] interface ethernet 0/0/2 //进入端口0/0/2
[SwitchA-Ethernet0/0/2] port link-type access //端口模式为access
[SwitchA-Ethernet0/0/2] port default vlan 3 //将端口加入vlan3中
[SwitchA-Ethernet0/0/2] quit //退出
步骤2 配置SwitchA上与SwitchB连接的端口类型及通过的VLAN。SwitchB配置与SwitchA类似,不再赘述。
[SwitchA] interface ethernet 0/0/3 //进入端口0/0/3
[SwitchA-Ethernet0/0/3] port link-type trunk //设置端口模式为trunk
[SwitchA-Ethernet0/0/3] port trunk allow-pass vlan 2 3 //trunk口允许通过vlan2与vlan3的数据包
步骤3 验证配置结果将User1和User2配置在一个网段,比如192.168.100.0/24;将User3和User4配置在一个网段,比如192.168.200.0/24。
User1和User2能够互相ping通,但是均不能ping通User3和User4。User3和User4能够互相ping通,但是均不能ping通User1和User2。
二、基于MAC地址vlan划分方法
1、组网需求
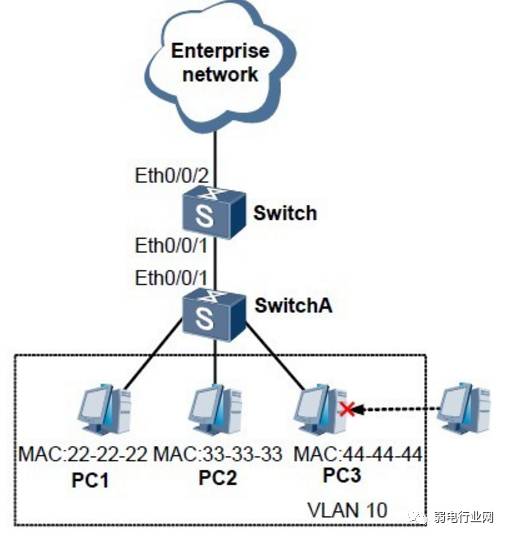
某个公司的网络中,网络管理者将同一部门的员工划分到同一VLAN。为了提高部门内的信息安全,要求只有本部门员工的PC才可以访问公司网络。
如图2所示,PC1、PC2、PC3为本部门员工的PC,要求这几台PC可以通过SwitchA、Switch访问公司网络,如换成其他PC则不能访问。可以配置基于MAC地址划分VLAN,将本部门员工PC的MAC地址与VLAN绑定,从而实现该需求。
2、操作步骤
这里面弱电君对上面重复的注释就不再解释了,和上面一样,大家也可以验证下,经过上面的理解,是否能认识下面的配置代码。
步骤1 配置Switch
# 创建VLAN
[Quidway] system-view
[Quidway] vlan batch 10 100
# 配置接口的PVID和加入VLAN
[Quidway] interface ethernet 0/0/1
[Quidway-Ethernet0/0/1] port hybrid pvid vlan 100 //将接口以加入到vlan100
[Quidway-Ethernet0/0/1] port hybrid untagged vlan 10 //untagged是指当数据离开端口时脱掉标签,指定端口允许VLAN 10的数据帧通过,且发送时不带VLAN标签
[Quidway-Ethernet0/0/1] quit #退出
[Quidway] interface ethernet 0/0/2 #进入端口0/0/2
[Quidway-Ethernet0/0/2] port hybrid tagged vlan 10 //tagged是指当数据离开端口时带着标签,指定允许VLAN 10的数据帧通过,且发送时必须带有VLAN标签
[Quidway-Ethernet0/0/2] quit
# PC的MAC地址与VLAN10关联
[Quidway] vlan 10
[Quidway-Vlan10] mac-vlan mac-address 22-22-22
//关联pc1的mac地址
[Quidway-Vlan10] mac-vlan mac-address 33-33-33
//关联pc2的mac地址
[Quidway-Vlan10] mac-vlan mac-address 44-44-44
//关联pc3的mac地址
[Quidway-Vlan10] quit
# 使能接口的基于MAC地址划分VLAN功能
[Quidway] interface ethernet 0/0/1
[Quidway-Ethernet0/0/1] mac-vlan enable
//起动端口的mac-vlan功能
[Quidway-Ethernet0/0/1] quit
三、基于IP子网的vlan划分
1、组网需求
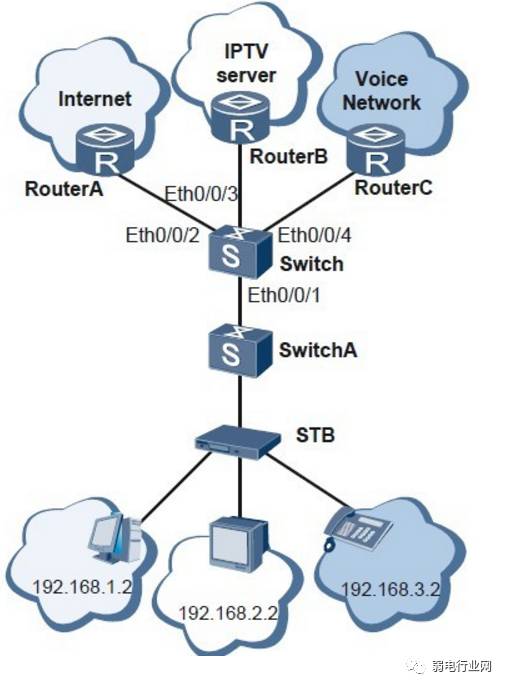
某企业拥有多种业务,如IPTV、VoIP、Internet等,每种业务使用的IP地址网段各不相同。为了便于管理,现需要将同一种类型业务划分到同一VLAN中,不同类型的业务划分到不同VLAN中。
如图3所示,Switch接收到用户报文有数据、IPTV、语音等多种业务,用户设备的IP地址网段各不相同。现需要将不同类型的业务划分到不同的VLAN中,通过不同的VLANID分流到不同的远端服务器上以实现业务互通。
这类在实际应用中是比较多的。
2、配置思路
采用如下的思路配置基于IP子网划分VLAN:
a、创建VLAN,确定每种业务所属的VLAN。
b、关联IP子网和VLAN,实现根据报文中的源IP地址或指定网段确定VLAN。
c、配置端口加入VLAN,实现基于IP子网的VLAN通过当前端口。
d、配置VLAN划分方式的优先级,确保优先选择基于IP子网划分VLAN。
e、使能基于IP子网划分VLAN。
3、操作步骤
步骤1 创建VLAN
# 在Switch上创建VLAN100、VLAN200和VLAN300。
[Quidway] system-view
[Quidway] vlan batch 100 200 300
步骤2 配置接口
# 在Switch上配置接口Eth0/0/1为Hybrid类型,并加入VLAN100、VLAN200和VLAN300。
[Quidway] interface ethernet 0/0/1
[Quidway-Ethernet0/0/1] port link-type hybrid //设置端口为hybrid模式
[Quidway-Ethernet0/0/1] port hybrid untagged vlan100 200 300 //指定端口允许VLAN 100、vlan200、vlan300的数据帧通过,且发送时不带VLAN标签
[Quidway-Ethernet0/0/1] quit
# 在Switch上配置接口Eth0/0/2加入VLAN100。
[Quidway] interface ethernet 0/0/2
[Quidway-Ethernet0/0/2] port link-type trunk
[Quidway-Ethernet0/0/2] port trunk allow-pass vlan 100 //接口0/0/2加入vlan100
[Quidway-Ethernet0/0/2] quit
# 在Switch上配置接口Eth0/0/3加入VLAN200。
[Quidway] interface ethernet 0/0/3
[Quidway-Ethernet0/0/3] port link-type trunk
[Quidway-Ethernet0/0/3] port trunk allow-pass vlan 200 //接口0/0/3加入vlan200
[Quidway-Ethernet0/0/3] quit
# 在Switch上配置接口Eth0/0/4加入VLAN300。
[Quidway] interface ethernet 0/0/4
[Quidway-Ethernet0/0/4] port link-type trunk
[Quidway-Ethernet0/0/4] port trunk allow-pass vlan 300 //接口0/0/4加入vlan300
[Quidway-Ethernet0/0/4] quit
# 在Switch上配置接口Eth0/0/1使能基于IP子网划分VLAN功能。
[Quidway] interface ethernet 0/0/1
[Quidway-Ethernet0/0/1] ip-subnet-vlan enable
[Quidway-Ethernet0/0/1] quit
步骤3 配置基于IP子网划分VLAN
# 在Switch上配置VLAN100与IP地址192.168.1.2/24关联,优先级为2。
[Quidway] vlan 100
[Quidway-vlan100] ip-subnet-vlan 100 ip 192.168.1.2 24 priority 2
[Quidway-vlan100] quit
# 在Switch上配置VLAN200与IP地址192.168.2.2/24关联,优先级为3。
[Quidway] vlan 200
[Quidway-vlan200] ip-subnet-vlan 200 ip 192.168.2.2 24 priority 3
[Quidway-vlan200] quit
# 在Switch上配置VLAN300与IP地址192.168.3.2/24关联,优先级为4。
[Quidway] vlan 300
[Quidway-vlan300] ip-subnet-vlan 300 ip 192.168.3.2 24 priority 4
[Quidway-vlan300] quit
步骤4 验证配置结果
在Switch上执行以下命令,显示信息如下:
[Quidway] display ip-subnet-vlan vlan all
—————————————————————-
Vlan Index IpAddress SubnetMask Priority
—————————————————————-
100 1 192.168.1.2 255.255.255.0 2
200 1 192.168.2.2 255.255.255.0 3
300 1 192.168.3.2 255.255.255.0 4
—————————————————————-
ip-subnet-vlan count: 3 total count: 3
即为组网配置成功。